Today I had a quiet day at the office so I decided to learn how SCCM Task Sequences can be created with PowerShell.
Basic Setup
I'm currently running version SCCM 1706 so I had high hopes that there already is enough cmdlets to create a full-blown TS from scratch. Well I didn't quite succeed so I'm now posting some of my findings for now. My TEST env is called PROD.
Fail and hard!
Configuration Manager Documentation
Latest docs for CM PowerShell can be found here:
https://docs.microsoft.com/en-us/powershell/sccm/configurationmanager/vlatest. Unfortunatelly the documentation is not complete and only some basic code examples can be found. So no help from there...
Try-And-See
Next step: Try and see what can be done. Create Conditions. Create Steps. Create disk partitioning schemes. Create Groups. Finally create a Task Sequence and add the steps to it. Shouldn't be that hard.
Try-And-Fail
You guessed it:
I Failed! I didn't have so much time that I could have tested all possible scenarios but here is what I tried:
- Conditions in steps: Condition Variables New-CMTaskSequenceStepConditionVariable and WMI Queries New-CMTaskSequenceStepConditionQueryWMI nothing so fancy there. Success!
- Reboots: Basic New-CMTaskSequenceStepReboot stuff too. Success!
- Disk Partitioning: BIOS and UEFI partitions. Create a partition scheme New-CMTaskSequencePartitionSetting and new partitions New-CMTaskSequenceStepPartitionDisk with it. Success!
- BitLocker: If you use AdminUI you can just select Add > Disk > Pre-provision/Enable/Disable BitLocker but no cmdlets for BitLocker. Had to do with New-CMTaskSequenceStepRunCommandLine. Fail!
- Apply <something>: New basic TS created from AdminUI has "Install Operating System" group which contains steps "Apply Operating System", "Apply Windows Settings", "Apply Network Settings". (Also there is "Apply Device Drivers" but we don't use that, it's of type Auto Apply Drivers which is baaaad for your health, ok?). Couldn't find any of these as cmdlets. Fail!
- Running PowerShell in TS: Couldn't create the task step at all. Failed to validate property Parameters. I'll have to look into this more closely. Fail!
Now what you say, don't I know how to set those
Apply <something> when creating the Task Sequence? Yes I do but I wanted to do a Custom TS
New-CMTaskSequence -CustomTaskSequence. If I create a basic OS image install TS
New-CMTaskSequence -InstallOperatingSystemImage then I'm stuck with the out-of-the-box TS that I cannot modify as seems that
there is no way to insert or re-arrange the steps in TS with PowerShell, not that I know of.
Fail again!
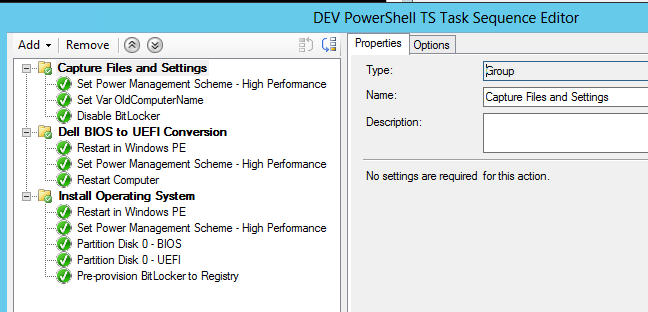
The Task Sequence
This is what I got so far. Not much.
 |
| Task Sequence created with PowerShell |
The Code
I'll just copy-paste my code here and will continue when there is (free) time at work.
Cheers,
-Ari
# Conditions
$TSConditionSMSTSNotInWinPE = New-CMTaskSequenceStepConditionVariable -ConditionVariableName '_SMSTSInWinPE' -OperatorType Equals -ConditionVariableValue $false
$TSConditionSMSBootNotUEFI = New-CMTaskSequenceStepConditionVariable -ConditionVariableName '_SMSTSBootUEFI' -OperatorType NotEquals -ConditionVariableValue $true
$TSConditionManufacturerDell = New-CMTaskSequenceStepConditionQueryWMI -Namespace root\cimv2 -Query "SELECT * FROM Win32_ComputerSystem WHERE Manufacturer LIKE '%Dell Inc.%'"
# multiple times used steps
$TSStepHighPower = New-CMTaskSequenceStepRunCommandLine -Name 'Set Power Management Scheme - High Performance' -CommandLine '%PROCESSOR_ARCHITECTURE%\PowerCfg.exe /s 8c5e7fda-e8bf-4a96-9a85-a6e23a8c635c' -PackageId 'L0100225'
$TSStepRestartIfNotInWinPE = New-CMTaskSequenceStepReboot -Name 'Restart in Windows PE' -RunAfterRestart WinPE -NotificationMessage $null -Condition $TSConditionSMSTSNotInWinPE
$TSStepRestartComputer = New-CMTaskSequenceStepReboot -Name 'Restart Computer' -RunAfterRestart WinPE -NotificationMessage $null
# BitLocker related
$TSStepDisableBitLocker = New-CMTaskSequenceStepRunCommandLine -name 'Disable BitLocker' -CommandLine 'powershell.exe -Command {Disable-BitLocker -MountPoint C:} -ExecutionPolicy Bypass'
$TSStepPreProvisionBitLokcer = New-CMTaskSequenceStepRunCommandLine -Name 'Pre-provision BitLocker to Registry' -CommandLine 'regedit.exe -s .\BitLockerPolicy.reg' -PackageId 'L010021C'
# BIOS partition scheme
$BIOSPartitionScheme = @(
$(New-CMTaskSequencePartitionSetting -PartitionPrimary -Name 'System Reserved' -Size 750 -SizeUnit MB -EnableDriveLetterAssignment $false -IsBootPartition $true),
$(New-CMTaskSequencePartitionSetting -PartitionPrimary -Name 'Windows' -Size 100 -SizeUnit Percent)
)
$TSStepBIOSPartition = New-CMTaskSequenceStepPartitionDisk -Name 'Partition Disk 0 - BIOS' -DiskType Mbr -DiskNumber 0 -PartitionSetting $BIOSPartitionScheme
# UEFI partition scheme
$UEFIPartitionScheme = @(
$(New-CMTaskSequencePartitionSetting -PartitionEfi -Size 1 -SizeUnit GB),
$(New-CMTaskSequencePartitionSetting -PartitionMsr -Size 128 -SizeUnit MB),
$(New-CMTaskSequencePartitionSetting -PartitionPrimary -Name 'Windows' -Size 99 -SizeUnit Percent),
$(New-CMTaskSequencePartitionSetting -PartitionRecovery -Name 'Windows' -Size 1 -SizeUnit Percent)
)
$TSStepUEFIPartition = New-CMTaskSequenceStepPartitionDisk -Name 'Partition Disk 0 - UEFI' -DiskType Gpt -DiskNumber 0 -PartitionSetting $UEFIPartitionScheme
# Steps
$TSGroupCapture = New-CMTaskSequenceGroup -Name 'Capture Files and Settings' `
-Step @(
$TSStepHighPower,
$(New-CMTaskSequenceStepSetVariable -Name 'Set Var OldComputerName' -TaskSequenceVariable OldComputerName -TaskSequenceVariableValue '%COMPUTERNAME%'),
# this will fail and I dont know why
# $(New-CMTaskSequenceStepRunPowerShellScript -Name 'Run PowerShell BackupICashFiles' -PackageId 'L010004D' -ScriptName 'BackupICashFiles.ps1' -ExecutionPolicy Bypass),
$TSStepDisableBitLocker
)
$TSGroupUEFIConversion = New-CMTaskSequenceGroup -Name 'Dell BIOS to UEFI Conversion' `
-Step @(
$TSStepRestartIfNotInWinPE,
$TSStepHighPower,
# Dell CCTK goes here
$TSStepRestartComputer
) `
-Condition @($TSConditionSMSBootNotUEFI, $TSConditionManufacturerDell)
$TSGroupInstallOS = New-CMTaskSequenceGroup -Name 'Install Operating System' `
-Step @($TSStepRestartIfNotInWinPE, $TSStepHighPower, $TSStepBIOSPartition, $TSStepUEFIPartition, $TSStepPreProvisionBitLokcer)
# The TS
$newts = New-CMTaskSequence -CustomTaskSequence `
-Name $tsname -Description 'PowerShell created TS' `
-BootImagePackageId $bootimg.PackageID -Verbose
# Or This
$newts = New-CMTaskSequence -InstallOperatingSystemImage `
-Name $tsname -Description 'PowerShell created TS' `
-BootImagePackageId $bootimg.PackageID -OperatingSystemImagePackageId $instimg.PackageID -OperatingSystemImageIndex 1 `
-JoinDomain DomainType -DomainName 'mydomain.local' -DomainOrganizationUnit 'LDAP://OU=Catch-All,OU=ITOPS,DC=mydomain,DC=local' -DomainAccount 'mydomain\SCCM-DomainJoin'
# Add TS Steps
Add-CMTaskSequenceStep -InputObject $newts -Step ($TSGroupCapture, $TSGroupUEFIConversion, $TSGroupInstallOS) -Verbose